Device connectivity
In order to get the most out of your devices, you need to ensure that they have access to the following:
- An internal Wi-Fi LAN (Local Area Network) connection, which allows the headsets and a designated computer/laptop to communicate between each other.
- An External internet connection, so that the devices can download firmware/client updates, as well as the content that is used on the headsets.
Note: Both the designated computer for administration and the headsets need visibility across the LAN (Local Area Network) otherwise the devices may appear as disconnected in the ClassVR portal.
Network check
It is possible that local security settings, firewalls or network restrictions are preventing communication between the computer and the headsets, or stopping content and updates from downloading. To check this, visit the following URL on a computer that is on the same Wi-Fi connection as the headsets:
Settings pertaining to ClassVR will have the orange ‘infinity’ logo:
Checking connectivity on the ClassVR headsets
You can also check internet and network connectivity on the headset by selecting the information icon:

If there are any items in the list that have a red cross against them, we would recommend checking with your IT provider to see what is blocking them. (Note that it is possible that the ‘UDP broadcast’ has been disabled by default, which results in this always having a red cross next to it)
Key Hostnames
These hostnames are required in order for the headsets to download essential updates, as well as the content used for the full ClassVR experience:
- *.classvr.com / portal.classvr.com (ClassVR web portal)
- *.avncloud.com (Authenticated web-based services)
- device.avncloud.com (Device telemetry and control services)
- data.avncloud.com (Device updates are downloaded from here)
- *.avnfs.com (Avantis File System)
- *.eduverse.com (Expeditions web portal)
- edvr.se (Hall passes for Eduverse)
- scene.link (Eduverse media links)
- connect.learnpad.com (legacy server / authentication SSO)
- *.avnlan.link (Local device connection services)
3rd party hostnames
- gravatar.com unpkg.com (Avatar display assets)
- *.thinglink.com (ThingLink shared resources)
- *CoSpaces.com
- *.360cities.net (360Cities static assets)
- *.us-hub.link / *.eu-hub.link / *.ap-hub.link / *.me-hub.link (WebSocket connection to *.eduverse.com)
Time Sync
- time.avncloud.com
If the devices fail to have a correct time this will impact the ability to establish SSL connections, therefore any HTTPS connections that are required for function will fail.
Note: External UDP or NTP connections may be blocked for reasons of security. To resolve, configure a custom DNS entry to redirect time.avncloud.com to your own internal NTP host or IP.
Mailer / ClassVR Invites
- *.AvantisEducation.com
Filetypes
To allow the headsets to update with the latest software, please ensure that the following filetypes are white-listed on your firewall or antivirus software:
- Firmware update (.ZIP)
- Client update (.APK)
The headsets will download these as they are required when they are online automatically.
Ports
To connect to the resources required to download content and communicate with the hostnames, the devices use ports 80 & 443 (SSL). Also check that both the headsets and host computer should have the correct date and time in order to establish the required SSL connections.
All communication between the portal and the headsets is internal across the LAN using WebSocket over HTTPS. This begins with a TCP request from your browser to determine if the headsets are switched on, online and accessible on the local network, this is determined by the device’s last recorded IP address. After this, a WebSocket connection is established via ports 37395 - 37399 using a secure URI.

When the devices and the computer/laptop being used to administer them are all online and can access the relevant resources, they should come up in the ClassVR portal as connected:
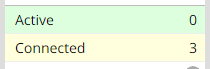
The devices will only show as active when they are being used and/or the light sensor between the lenses is covered.
DNS Rebinding
As the ClassVR portal is fully encrypted using HTTPS the direct communication to the headsets needs to be resolved using a secure URI e.g 192-168-1-1.avnlan.link instead of direct to IP 192.168.1.1 as it was previously under HTTP.
Note: As the URI used is a DNS rebinding function, *.avnlan.link may need to be excluded from your firewall 'DNS rebinding protection' or an alternative DNS such as Google 8.8.8.8 or Cloudflare 1.1.1.1 could be added to your local machine resolve. Contact our support Team if your require further assistance or guidance.
Legacy Network Mode
The migration of the ClassVR Portal to full HTTPS has highlighted that some older routers and secure environments may restrict the use of DNS rebinding methodology. This may cause your devices to appear as 'Disconnected' in the Deliver section of the portal, while still checking in normally in the Administration > Devices section. For this reason we have added an option to revert back to HTTP for the internal function of the portal, after authentication and login under HTTPS.
- Go to the settings and 'Enable Legacy Network Mode'.
This will revert back to using HTTPS and allow you to use the site as it was prior to the HTTPS migration.

All functionality of the portal is the same, however your browser may state it is 'not secure' as the internal communications are no longer encrypted under HTTP.
Wi-Fi connection
You can check the Wi-Fi connection status on the headset – the connectivity icon is located at the bottom of the home screen view:
| Icons | Meaning |
 | Currently connected to a WiFi network and signal strength. |
 | Wi-Fi is turned on on the headset but not connected to a Wi-Fi network. |
 | Connected to a Wi-Fi network, but cannot access the Internet or the Internet connection is blocked. (Possible proxy details required) |
 | Wi-Fi is turned off. |
 | There is a potential issue with the headset's Wi-Fi connectivity. This can usually be fixed by restarting. |
SSL Certificates
You can add SSL certificates within the Administration section on the ClassVR portal that will be automatically added to the devices after they check-in to the portal.
https://portal.classvr.com/manage/index.cfm
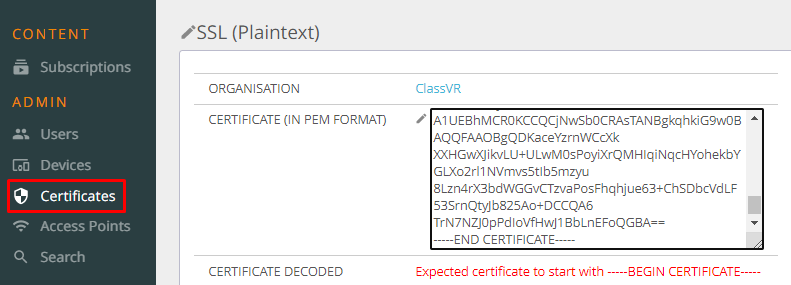
Certificate information needs to be in (PEM) text format so any *.cert files will need to be converted. The Certificate information will be validated on entry.
Access Points
Adding additional or even initial WiFi details directly to your portal will prepare the devices prior to visiting an alternative site or location and have the details of the SSID and Password pre-cached to the devices.
https://portal.classvr.com/manage/index.cfm

The headsets will need to check in to the portal initially to collect any information set in the ClassVR administration portal. this can be verified by visiting the 'Devices' control panel.
https://portal.classvr.com/manage/devices.cfm
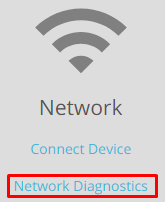
Network Diagnostics
A Network Diagnostics page is accessible from within the settings section of the ClassVR portal.
Click the Settings icon in the top-right corner of the ClassVR portal, then Network Diagnostics should be located under the Network section.
You can also click this link: http://portal.classvr.com/connect/player/diagnostics.cfm
From here, you can see the details of each device that is connected. You can also test various connectivity and upload/download ability.

Note: After performing these tests, ensure that you click 'Idle' when you have finished so that the headsets return to an idle state.